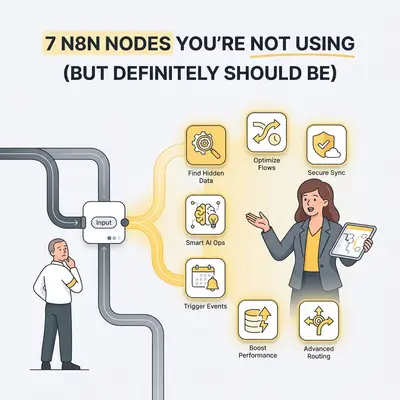
Most n8n users get stuck in a "Webhook → Google Sheets → HTTP Request" loop. It works, but it's messy. You end up with giant, spaghetti-like workflows that are impossible to debug and break the moment an API changes.
The real power of n8n lies in the nodes that handle logic, data transformation, and modularity. These are the tools that separate a hobbyist tinkerer from an automation engineer.
If you want your workflows to be cleaner, faster, and more reliable, you need to stop ignoring these seven nodes.
1. Item Lists (The Array Tamer)
If you've ever connected an API that returns 50 leads, but the next node only processes the first one (or fails entirely), you've met the "JSON Array" problem.
Beginners often try to write complex JavaScript in a Code node to fix this. You don't need code. You need the Item Lists node.
Why You Need It
APIs often return data in lists (arrays). Sometimes you need to break that list apart to process items individually (like sending 50 separate emails). Other times, you have 50 separate results that you need to bundle into a single report.
The "Aha!" Moment
Use "Split Out Items" to turn one big list into individual execution items. Use "Aggregate Items" to bundle them back up. It’s the traffic controller for your data structure.
Pro Tip: If your Google Sheet returns 100 rows but you want to send one Slack summary, use the "Aggregate Items" operation right before the Slack node.
2. Switch (The "If" Node Killer)
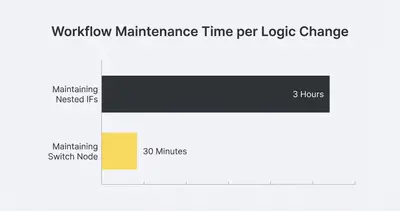
New users love the If node. But what happens when you have five different possibilities?
- If "Lead Score" > 80, send to Sales.
- If "Lead Score" is 50-79, send to Nurture.
- If "Lead Score" < 50, archive.
Using "If" nodes requires nesting them inside each other like Russian dolls. It’s ugly and hard to read.
Why You Need It
The Switch node handles multiple logic paths in a single step. It’s cleaner, faster to configure, and infinitely easier to visualize on your canvas.
Use Case
Routing customer support tickets.
- Output 1: Subject contains "Billing" → Send to Finance.
- Output 2: Subject contains "Bug" → Send to Jira.
- Output 3: Subject contains "Feature" → Send to Product.
- Default: Send to General Inbox.
One node, four clean paths.
3. Execute Workflow (The Secret to Scaling)
This is the single most important node for scaling your automation agency or internal systems.
Most people build "Monolithic" workflows—giant 50-node beasts that do everything. If you need to fix the error handling logic, you have to edit it in 10 different places.
Why You Need It
The Execute Workflow node allows you to run another workflow inside your current one. It turns workflows into reusable functions.
The "Aha!" Moment
Build a "Standard Error Handler" workflow that sends a Slack alert and logs to a database. Then, in every other workflow you build, just add an Execute Workflow node connected to the Error Output.
If you ever want to change how errors are reported (e.g., switch from Slack to Teams), you update one workflow, and all 50 of your automations are instantly updated.
Key Insight: Treat your workflows like Lego blocks. Build a "Lead Enrichment" block, a "Slack Notification" block, and a "CRM Update" block. Then just connect them.
4. Split In Batches (The API Savior)
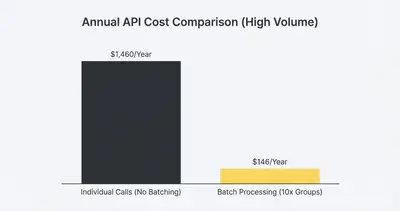
APIs have rate limits. If you try to send 1,000 emails in 2 seconds via Gmail, Google will block you. If you try to ask OpenAI to generate 500 blog posts instantly, you'll hit a token limit.
Why You Need It
Split In Batches creates a loop. It takes your 1,000 items and feeds them through 10 at a time.
Use Case
- Split In Batches (Batch size: 10).
- HTTP Request (Process the 10 items).
- Wait (Wait 5 seconds).
- Connect back to Split In Batches.
This simple loop prevents 90% of API timeout errors. It turns a fragile script into a robust production system.
5. Wait (The Human-in-the-Loop)
Automation shouldn't always be 100% automated. Sometimes you need a human approval before sending that contract or publishing that tweet.
Why You Need It
The Wait node isn't just a timer (e.g., "Wait 1 hour"). Its most powerful mode is "On Webhook Call".
The "Aha!" Moment
- Workflow generates a draft email.
- It sends you a Slack message with a button: "Approve".
- The workflow pauses at the Wait node. It stays there for hours or days.
- When you click "Approve" (which triggers the specific webhook), the workflow resumes, sends the email, and marks the deal as closed.
This turns n8n from a background script into a collaborative team tool.
6. Merge (The Data Unifier)
You have data from Stripe (Customer Email, Amount) and data from your CRM (Customer Email, Name). You need to combine them.
Beginners often try to do this with lookups inside loops, which is slow and complex.
Why You Need It
The Merge node joins two streams of data.
- "Merge by Key" is the magic setting. It acts like a VLOOKUP in Excel or a SQL JOIN.
- It matches items from Input A and Input B based on a common field (like email) and outputs one clean, combined object.
Quick Win: Use Merge to check if a record already exists. Merge your "New Leads" with "Existing Customers". If they match, update them. If they don't, create new ones.
7. Sticky Note (The Documentation Hero)
Technically, this isn't a "node" that executes logic, but it's a feature you're likely ignoring.
When you open a workflow you built six months ago, you won't remember why you used that weird Regex in the HTML Extract node.
Why You Need It
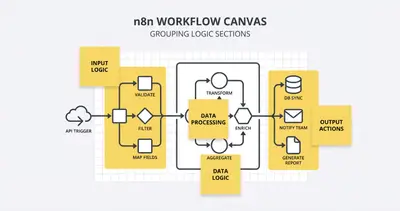
Sticky Notes let you place colored text blocks directly on the canvas background.
Use Case
- Yellow: General process descriptions ("This section enriches lead data").
- Red: Warnings ("DO NOT DELETE - Required for legacy API").
- Green: Instructions for teammates ("Change this email address to test").
Documentation is the difference between a "script" and a "product." If you hand off automation to a client or team member, Sticky Notes are mandatory.
Summary: Upgrade Your Toolbelt
Sticking to the basics limits what you can build. By adding these 7 nodes to your repertoire, you move from simple task automation to building resilient, scalable business infrastructure.
- Item Lists: Manage your arrays.
- Switch: Clean up your logic.
- Execute Workflow: Build reusable modules.
- Split In Batches: Respect API limits.
- Wait: Add human approval.
- Merge: Combine data sources easily.
- Sticky Note: Document for the future.
Ready to optimize your existing workflows? Open your n8n editor right now and replace those nested IF nodes with a Switch. Your future self will thank you.
zation Techniques Full Guide](/blog/n8n-workflow-optimization-techniques-full-guide)
- Stop Paying For 10 Different Saas Tools Build Them In N8n
- N8n Vs Make Why Small Businesses Are Switching 2025
- How To Improve N8n Workflow Performance Tips Faster Stable Flows
Official Sources
- n8n Documentation - Core Nodes
- n8n Academy - Beginner to Advanced Courses
- n8n Community Forum
Author Bio: Kevin Michael Schindler is an AI Automation Expert at Evalics, specializing in building scalable n8n architectures for high-growth businesses.