
You just closed a major deal. The client signed the proposal, and the Stripe notification chimes—the invoice is paid.
Instead of celebrating, you sigh. Now comes the worst part: the administrative tax of client onboarding.
You have to create a new folder in Google Drive. You need to copy their details into your CRM. You have to draft a welcome email with their specific deliverables, invite them to a client portal, and notify your team in Slack. If you run an agency or service business, this manual setup can easily drain an hour of your day.
When you scale to five or ten new clients a month, this manual process breaks. Folders get misplaced. Welcome emails get delayed. The client experiences a gap between paying the invoice and hearing from your team, which immediately triggers buyer's remorse.
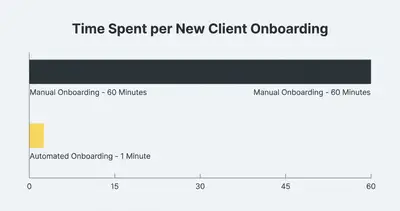
You can fix this entirely. By connecting your payment processor to an automation platform, you can turn a 60-minute administrative chore into a 60-second background process.
The Hidden Cost of Manual Onboarding
Most business owners severely underestimate the cost of manual administrative work. It feels like "just a few clicks," but context switching kills your productivity.
Let us break down a typical manual onboarding sequence:
- CRM Data Entry: 10 minutes
- Folder Setup & Permissions: 10 minutes
- Creating the Welcome Packet: 20 minutes
- Drafting the Welcome Email: 15 minutes
- Team Notifications: 5 minutes
That is 60 minutes per client. If your effective hourly rate is $150, you are spending $150 of your own time just to set up a workspace. If you onboard 10 clients a month, you are burning $18,000 worth of billable time every year on tasks a machine can do instantly.
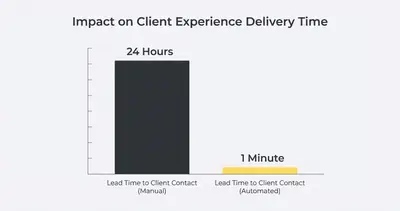
The financial cost is only half the problem. The real danger is the customer experience. According to HubSpot's customer success research, a smooth onboarding process significantly increases customer lifetime value. When a client pays thousands of dollars, they expect immediate, professional confirmation. Making them wait 24 hours because you are stuck in meetings damages their confidence.
The 60-Second Automated Architecture
To eliminate this bottleneck, we need to build a linear automation sequence. The logic is simple: when an event happens in App A, trigger a series of actions across Apps B, C, and D.
This is the core difference between rule-based vs AI automation. We do not need complex AI agents here; we need strict, reliable, step-by-step execution.
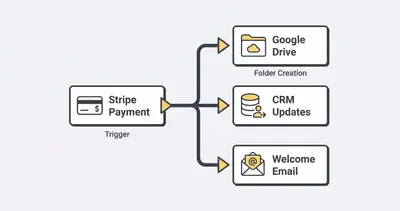
Here is the exact architecture of a professional onboarding workflow:
- The Trigger: A successful payment in Stripe (or a signed contract in DocuSign).
- Action 1 (Storage): Create a dedicated client folder in Google Drive.
- Action 2 (CRM): Update the client's status from "Lead" to "Active Customer" in HubSpot.
- Action 3 (Assets): Generate a personalized PDF Welcome Packet.
- Action 4 (Communication): Send the Welcome Email with all links attached.
- Action 5 (Internal): Ping the team channel in Slack with the new client's details.
Key Insight: The secret to a perfect workflow is passing data chronologically. The Stripe payment captures the client's email and company name. You use that company name to name the Google Drive folder. You then use the link from that new Google Drive folder and insert it directly into the welcome email. The data cascades forward.
Step-by-Step Implementation Guide
You do not need to hire a developer to build this. You can build it yourself using platforms like Make.com or n8n. If you want to consolidate your software costs, you can build this entirely in n8n.
Here is how to set up each phase of the automation.
Step 1: Catching the Payment Webhook
Your workflow needs a starting line. Relying on an email notification is risky. Instead, use a webhook directly from your payment processor.
When a client pays an invoice, Stripe generates a data payload containing the client's name, email, payment amount, and custom metadata (like the service package they bought).
- Create a "Webhook" trigger in your automation platform.
- Copy the webhook URL provided.
- Go to your Stripe Developer settings and paste the URL.
- Select the event
invoice.payment_succeeded.
Now, the moment a credit card clears, your workflow instantly receives the client's exact data.
Step 2: Creating the Workspace Architecture
Your team needs a centralized place to work. Manually creating folders and setting sharing permissions is tedious and prone to human error.
Add a Google Drive module to your workflow. Set the action to "Create a Folder."
Instead of naming it manually, use variables from your Stripe data. Map the folder name as: [Company Name] - Client Workspace.
Next, add a module to set the sharing permissions of that folder. Set it to "Anyone with the link can view." This ensures your client never hits a frustrating "Request Access" wall when they click the folder link later.
Step 3: Generating the Welcome Packet
This is where the automation feels like magic to your client. You can generate custom documents on the fly.
- Create a master "Welcome Packet" template in Google Docs.
- Use double curly brackets for variable data, like
{{Client_Name}}or{{Service_Tier}}. - In your workflow, add a "Google Docs: Create Document from Template" module.
- Map the Stripe data to your bracketed tags. The automation will replace
{{Client_Name}}with "Sarah Jenkins". - Add an action to export that new Google Doc as a PDF.
Your client receives a document that looks painstakingly customized for them, but it was generated in milliseconds.
Pro Tip: If your services differ drastically based on what the client bought, use a routing node (or "Switch" node) in your workflow. If they bought Package A, generate Template A. If they bought Package B, generate Template B.
Step 4: Updating the Source of Truth (CRM)
Never update your CRM manually. It is the fastest way to corrupt your sales data.
Add a module for your CRM (HubSpot, ActiveCampaign, or Pipedrive). Search for the contact using the email address provided by Stripe.
Once the workflow finds the contact, have it update their lifecycle stage from "Lead" to "Customer." You can also have the workflow drop the newly created Google Drive link directly into a custom field on their CRM profile. This way, your team never has to hunt for client files again.
Step 5: The Client and Team Handoff
The final step is communication. The client needs their assets, and your team needs to know work is ready to begin.
Add a Gmail or Outlook module. Draft your welcome email directly in the workflow platform. Map in the variables:
- To:
[Client Email] - Subject: Welcome to the team,
[Company Name]! - Body: Map in the links to the Google Drive folder and attach the generated PDF Welcome Packet.
Finally, add a Slack or Microsoft Teams module. Route a message to your #general or #sales-wins channel:
"🎉 New client closed! [Company Name] just paid for the [Service Tier] package. The CRM is updated, folders are created, and the welcome packet was sent."
Handling Edge Cases and Failures
The most common mistake when building this is assuming the workflow will succeed 100% of the time.
APIs fail. Google Drive might experience a brief outage. The client might use a different email address to pay than the one they used in sales conversations.
You must build error handling into your process. In n8n, you can use "Error Trigger" nodes. If any step in the onboarding sequence fails, the workflow should immediately pause and send an urgent Slack message to you: "⚠️ Onboarding failed for [Company Name]. Manual intervention required at the Google Docs step."
This guarantees a client never falls through the cracks due to a software glitch. If you want to dive deeper into fail-safes, run your workflow through a simple 5-minute automation test to identify weak points before putting it into production.
Reality Check: What NOT to Automate
Automation is powerful, but over-automating ruins trust.
There is a hard line between administrative tasks and relationship building. You should completely automate data entry, folder creation, and initial asset delivery. You should never automate the actual kickoff call, strategy sessions, or relationship check-ins.
If a client feels like they are only interacting with scripts, they will churn. The goal of this 60-second workflow is not to eliminate human interaction. The goal is to clear the administrative garbage off your desk so you have the energy and time to run a phenomenal, high-touch kickoff call.
Read more about finding this balance in our guide on why automating everything ruins customer experience.
Summary and Next Steps
Automating your client onboarding is one of the highest-ROI technical investments you can make for your business. Let us recap why this works:
- It eliminates data entry errors. Systems copy and paste perfectly; humans do not.
- It reclaims billable hours. You save hundreds of hours a year by automating folder setups and email drafts.
- It elevates the client experience. Your new clients receive instant, customized validation the moment they pay.
You do not have to build the entire system today. Start small. Tomorrow, set up a simple two-step automation: when Stripe processes a payment, send a notification to Slack. Once you trust that connection, add the Google Drive folder creation. Build the sequence piece by piece.
Ready to stop doing manual admin work and start scaling? Book a demo with Evalics today and let us build a bulletproof onboarding system tailored to your exact service delivery model.
Related Resources
- The 5-Minute Test to See if Your Business Process Can Be Automated
- What is Rule-Based vs AI Automation Simple Guide
- Stop Paying for 10 Different SaaS Tools Build Them in n8n
- Why Automating Everything Ruins Customer Experience
Official Sources
- Stripe Webhooks Documentation
- Make.com Google Docs Integration Guide
- HubSpot: The Ultimate Guide to Customer Onboarding
By Kevin Michael Schindler, AI Automation Expert at Evalics