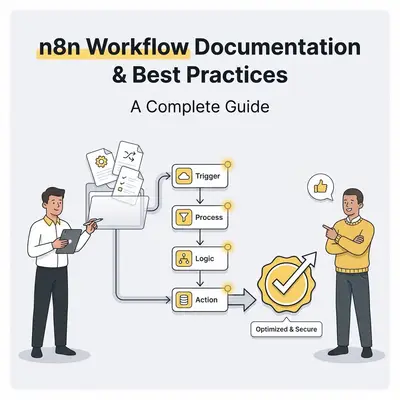
A development team has 50 n8n workflows running in production. When a workflow breaks, nobody knows what it does. New team members spend weeks figuring out existing automations. Workflow changes cause unexpected side effects because dependencies aren't documented.
Poor workflow documentation costs teams hours every week. Undocumented workflows become maintenance nightmares. Onboarding new team members takes 3-4x longer. Debugging failures requires reverse-engineering logic from JSON files.
This guide shows you how to document, name, and organize n8n workflows for teams and production setups. You'll learn naming conventions, JSON export strategies, Git version control, comment techniques, and shared library organization. By the end, you'll have a system that makes workflows maintainable and team-friendly.
Quick Win: Implementing consistent naming conventions and basic README documentation reduces workflow debugging time by 60-70%. A 15-person team saves 8-10 hours weekly on maintenance and onboarding.
Naming Conventions for Readability
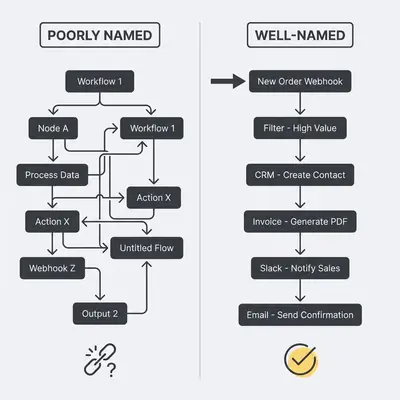
Clear naming makes workflows self-explanatory. Good names tell you what a workflow does, what triggers it, and where data goes. Bad names force you to open the workflow to understand it.
Why Naming Matters
Clarity: You immediately know what each workflow does without opening it. A name like "Email to CRM Sync" is clearer than "Workflow 23."
Maintainability: When workflows break, clear names help you find the right one quickly. You spend less time searching and more time fixing.
Collaboration: Team members understand workflows without asking you. New developers can contribute faster when names are descriptive.
Debugging: Execution logs show workflow names. Clear names make it easier to identify which workflow failed in production.
Workflow-Level Naming Patterns
Use consistent patterns across all workflows. Here are proven approaches:
Pattern 1: [Trigger] Action – Target
This pattern shows what starts the workflow and where data goes.
[Webhook] New Contact → CRM Update[Schedule] Daily Report → Email[Gmail] Invoice Received → Accounting Sheet
Pattern 2: Project_Phase_Action
Use this for workflows that belong to specific projects or phases.
CRM_Import_CleanupMarketing_Campaign_SetupSupport_Ticket_Routing
Pattern 3: Environment Prefixes
Add environment indicators for workflows that run in different stages.
DEV_Order_ProcessingSTAGING_Payment_SyncPROD_Customer_Onboarding
Pattern 4: Status Indicators
Include status for workflows in development or testing.
WIP_Lead_ScoringTEST_Email_TemplateDEPRECATED_Legacy_Sync
Node-Level Naming
Nodes need clear names too. Default names like "HTTP Request1" or "IF2" make workflows hard to read.
Function + Service Format:
Fetch Customer Data (CRM)Format Order DateValidate Email Address
Prefixing by Type:
API_GetUserDB_InsertOrderFilter_ActiveUsersTransform_FormatDate
Keep Case Consistent:
Choose one style and stick with it:
- camelCase:
fetchCustomerData - snake_case:
fetch_customer_data - Title Case:
Fetch Customer Data
Avoid special characters that complicate variable references.
Before and After Examples
Before (Poor Naming):
- Workflow: "Workflow 1"
- Nodes: "HTTP Request", "IF", "Code", "HTTP Request2"
After (Clear Naming):
- Workflow:
[Webhook] New Order → Inventory Sync - Nodes:
Receive_Order_Webhook,Validate_Order_Data,Format_Order_JSON,Update_Inventory_API
The second example tells you exactly what each piece does without opening the workflow.
Pro Tip: Rename nodes immediately after adding them. Don't wait until the workflow is complete. Clear names help you think through the logic as you build.
Documenting Workflows (JSON Export + README)
Workflow JSON files contain the automation logic, but they don't explain why decisions were made or what dependencies exist. README files bridge that gap.
Exporting Workflows as JSON
n8n workflows are stored as JSON files. Export them for version control and backup.
Using n8n UI:
- Open the workflow you want to export
- Click the three-dot menu (top right)
- Select "Download" or "Export"
- Save the JSON file
Using n8n CLI:
For bulk exports or automation:
n8n export:workflow --all --separate --pretty
This exports all workflows as separate, formatted JSON files. The --separate flag creates one file per workflow. The --pretty flag formats JSON for readability.
What Gets Exported:
- Workflow structure (nodes, connections)
- Node configurations
- Workflow settings
- Tags and metadata
What Doesn't Get Exported:
- Credentials (exported as stubs only)
- Execution history
- Workflow statistics
Creating README Files
A README file explains what the workflow does, how to use it, and what it requires.
Basic README Template:
# [Workflow Name]

## Purpose
Brief description of what this workflow does and why it exists.

## Trigger
What starts this workflow (webhook, schedule, manual, etc.)

## What It Does
Step-by-step explanation of the workflow's actions.

## Dependencies
- Required credentials
- External services
- Other workflows it depends on

## Configuration
Key settings that might need adjustment:
- API endpoints
- Email addresses
- Schedule times

## Testing
How to test this workflow:
- Test data to use
- Expected outputs
- Common issues

## Maintenance
- Last updated: [Date]
- Owner: [Name/Team]
- Related workflows: [Links]
Example README:
# [Webhook] New Order → Inventory Sync

## Purpose
Automatically updates inventory when a new order is received via webhook from our e-commerce platform.

## Trigger
Webhook endpoint: `/webhook/new-order`
Receives POST request with order data in JSON format.

## What It Does
1. Receives order webhook payload
2. Validates order data (customer email, product IDs, quantities)
3. Checks inventory availability
4. Updates inventory levels in database
5. Sends confirmation email to customer
6. Logs order to tracking sheet

## Dependencies
- E-commerce platform webhook credentials
- Database connection (PostgreSQL)
- Gmail account for notifications
- Google Sheets for order logging

## Configuration
- Webhook URL: Set in workflow settings
- Database connection: Uses environment variable `DB_CONNECTION_STRING`
- Email sender: `orders@company.com`

## Testing
Test with sample order payload:
```json
{
  "order_id": "TEST-123",
  "customer_email": "test@example.com",
  "products": [{"id": "PROD-001", "quantity": 2}]
}
Expected: Inventory updated, email sent, row added to sheet.
Maintenance
- Last updated: 2026-01-10
- Owner: Operations Team
- Related workflows: Order Processing, Inventory Alerts
### Best Practices for Workflow Documentation

**Keep READMEs Updated:**

Update README files when workflows change. Outdated documentation is worse than no documentation.

**Include Examples:**

Show sample input data and expected outputs. Examples help team members understand workflow behavior quickly.

**Document Edge Cases:**

Note any special conditions or error handling. Explain why certain logic exists.

**Link Related Workflows:**

If workflows depend on each other, link them in README files. This creates a knowledge map.

**Version Your Documentation:**

Include version numbers or dates in README files. Track changes over time.

> **Key Insight:** A well-documented workflow with a clear README saves 2-3 hours when debugging or onboarding. The time spent writing documentation pays off quickly.

## Version Control Workflows (Git, Branches)

Git integration makes n8n workflows manageable at scale. You can track changes, collaborate safely, and deploy workflows systematically.

### n8n Native Git Integration

n8n supports native Git integration through source control mode. This lets you push and pull workflows directly from your n8n instance.

**How It Works:**

- **Push:** Export workflows from n8n to Git repository
- **Pull:** Import workflows from Git into n8n instance
- **Sync:** Keep n8n and Git repositories in sync

**When to Use Native Integration:**

- Stable workflows in staging or production
- Team collaboration on shared workflows
- Automated deployment pipelines

**When to Use Manual Export:**

- Rapid development and testing
- Workflows that change frequently
- Local development instances

### Setting Up Git for n8n Workflows

**Step 1: Create Repository Structure**

Organize workflows in a clear folder structure:
n8n-workflows/ ├── workflows/ │ ├── production/ │ │ ├── sales/ │ │ ├── marketing/ │ │ └── operations/ │ ├── staging/ │ └── development/ ├── credentials/ │ └── stubs/ ├── README.md └── .gitignore
**Step 2: Export Workflows**

Export each workflow as a separate JSON file:

```bash
# Export single workflow
n8n export:workflow --id=123 --output=workflows/production/sales/order-sync.json

# Export all workflows
n8n export:workflow --all --separate --output=workflows/
Step 3: Create .gitignore
Exclude sensitive files:
# Credentials (never commit actual secrets)
credentials/*.json
!credentials/stubs/

# Environment-specific configs
.env
config.local.json

# Temporary files
*.tmp
*.log
Step 4: Initialize Git Repository
git init
git add workflows/
git add README.md
git commit -m "Initial workflow export"
git remote add origin <repository-url>
git push -u origin main
Branching Strategies
Use Git branches to develop workflows safely.
Feature Branch Workflow:
- Create feature branch:
git checkout -b feature/new-order-workflow - Develop and test workflow locally
- Export workflow JSON to branch
- Commit changes:
git commit -m "Add new order processing workflow" - Push branch:
git push origin feature/new-order-workflow - Create pull request for review
- Merge to main after approval
Environment Branches:
Separate branches for different environments:
main- Production workflowsstaging- Staging environment workflowsdevelopment- Development and testing
Workflow:
- Develop in
developmentbranch - Test in staging environment (pull from
stagingbranch) - Deploy to production (pull from
mainbranch)
Commit Message Conventions
Clear commit messages help track changes over time.
Format: [Type] Description
Types:
[Add]- New workflow added[Update]- Existing workflow modified[Fix]- Bug fix in workflow[Remove]- Workflow deleted[Refactor]- Workflow restructured[Docs]- Documentation updated
Examples:
[Add] Order processing workflow with inventory sync[Update] Email notification workflow to include attachments[Fix] Webhook validation logic in customer onboarding[Refactor] Split large workflow into modular sub-workflows
Managing Workflow Changes
Before Making Changes:
- Create feature branch
- Export current workflow state
- Document planned changes in commit message
During Development:
- Test changes in development environment
- Update README if workflow behavior changes
- Commit frequently with clear messages
Before Merging:
- Review JSON diff to understand changes
- Verify no credentials are included
- Test workflow in staging environment
- Update documentation if needed
After Merging:
- Pull changes into target n8n instance
- Verify workflow works correctly
- Monitor first few executions
Reality Check: n8n's Git pull doesn't merge changes—it overwrites local workflows. Always push local changes before pulling in production. Use branches to avoid losing work.
Comments and Annotations in Workflow Definitions
Comments explain why workflows do what they do. They help future you and your team understand decisions that aren't obvious from the workflow structure.
Using Sticky Notes
n8n includes sticky notes (Note nodes) for documenting workflow sections. They're perfect for explaining complex logic blocks.
When to Use Sticky Notes:
- Explain why a group of nodes exists
- Document business logic or rules
- Note edge cases or special conditions
- Reference external documentation
How to Add Sticky Notes:
- Click the "+" button in n8n editor
- Select "Note" node
- Type your explanation
- Position note near relevant nodes
- Resize to cover the section you're documenting
Sticky Note Best Practices:
- Use Markdown formatting for readability
- Keep notes concise but complete
- Update notes when logic changes
- Group related nodes with one note
Example Sticky Note:
### Data Validation Block

This section validates incoming order data before processing:
- Checks customer email format
- Verifies product IDs exist in database
- Ensures quantities are positive numbers

If validation fails, workflow stops and sends error notification.
Node Descriptions
Each node has a description field. Use it to document assumptions and dependencies.
What to Include:
- What the node does (if not obvious from name)
- Why this specific configuration was chosen
- Dependencies on other nodes or external services
- Expected input/output formats
- Any special handling or edge cases
Example Node Descriptions:
HTTP Request Node:
Fetches customer data from CRM API.
Requires valid API key in credentials.
Returns JSON with customer_id, email, and company_name.
Handles 404 errors by returning empty object.
IF Node:
Checks if order total exceeds $100 for free shipping eligibility.
Uses order_total field from previous node.
If true, sets shipping_cost to 0.
Workflow-Level Descriptions
Add a high-level description to the workflow itself. This appears in workflow settings.
What to Include:
- Workflow purpose and business value
- What triggers it
- Key inputs and outputs
- Frequency or schedule
- Side effects or dependencies
- Owner or team responsible
Example Workflow Description:
Automatically processes new customer orders from e-commerce platform.

Trigger: Webhook receives order data when customer completes purchase.

Inputs: Order JSON with customer info, products, and payment details.

Outputs:
- Inventory updated in database
- Confirmation email sent to customer
- Order logged to tracking sheet

Runs: Real-time on each order

Dependencies: Requires CRM API access and email service credentials.

Owner: Operations Team
Best Practices for Inline Documentation
Document the Why, Not Just the What:
Don't just describe what a node does. Explain why you made that choice.
Bad: "HTTP Request node gets customer data"
Good: "HTTP Request fetches customer data from CRM. We use this endpoint instead of the bulk API because it provides real-time data and handles rate limits better."
Keep Documentation Current:
Update comments when workflows change. Outdated comments mislead team members.
Use Consistent Formatting:
Establish a style guide for your team. Consistent formatting makes documentation easier to scan.
Don't Over-Document:
Simple, obvious nodes don't need extensive documentation. Focus on complex logic and non-obvious decisions.
Example: A sticky note explaining a complex conditional routing decision saves 30 minutes when debugging. The 2 minutes spent writing it pays off quickly.
Organizing Shared Workflow Libraries
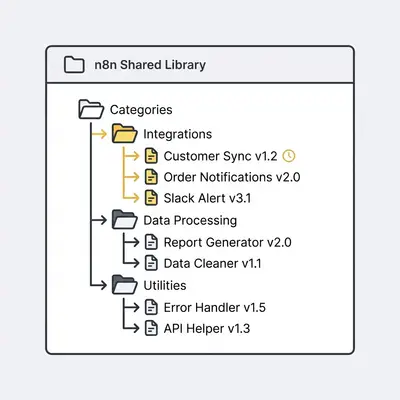
As your team grows, workflow organization becomes critical. A well-organized library makes workflows discoverable and maintainable.
Folder Structure Strategies
Choose a structure that matches how your team works.
Strategy 1: By Department
Organize workflows by team or department:
workflows/
├── sales/
│   ├── lead-qualification.json
│   ├── crm-sync.json
│   └── follow-up-automation.json
├── marketing/
│   ├── email-campaigns.json
│   ├── social-media-posting.json
│   └── analytics-reporting.json
├── operations/
│   ├── inventory-management.json
│   ├── order-processing.json
│   └── shipping-notifications.json
└── support/
    ├── ticket-routing.json
    ├── customer-feedback.json
    └── knowledge-base-updates.json
Strategy 2: By Project
Group workflows by project or initiative:
workflows/
├── customer-onboarding/
│   ├── welcome-email-sequence.json
│   ├── account-setup-automation.json
│   └── first-purchase-trigger.json
├── inventory-optimization/
│   ├── stock-level-monitoring.json
│   ├── reorder-alerts.json
│   └── supplier-notifications.json
└── q4-campaign-2025/
    ├── holiday-email-series.json
    ├── social-media-schedule.json
    └── performance-tracking.json
Strategy 3: By Environment
Separate workflows by deployment environment:
workflows/
├── production/
│   ├── sales/
│   ├── marketing/
│   └── operations/
├── staging/
│   └── [same structure as production]
└── development/
    └── [experimental workflows]
Strategy 4: Hybrid Approach
Combine multiple strategies:
workflows/
├── production/
│   ├── sales/
│   │   ├── lead-management/
│   │   └── crm-integration/
│   └── marketing/
│       ├── email-campaigns/
│       └── social-automation/
└── staging/
    └── [mirror production structure]
Categorization with Tags
n8n supports tags for workflow organization. Use them alongside folder structures.
Tag Categories:
Status Tags:
active- Currently running in productiondraft- Under developmentdeprecated- Being phased outarchived- No longer used
Frequency Tags:
real-time- Triggers on eventsdaily- Runs once per dayweekly- Runs weeklyon-demand- Manual execution only
System Tags:
crm- Integrates with CRMemail- Email-related workflowsapi- API integrationsdatabase- Database operations
Department Tags:
sales- Sales team workflowsmarketing- Marketing workflowssupport- Customer support workflows
Example Tag Combinations:
active,real-time,crm,salesdraft,daily,email,marketingdeprecated,weekly,database
Template Library Management
Create a library of reusable workflow templates for common tasks.
Template Categories:
Common Integrations:
- Gmail to Google Sheets
- Webhook to Database
- Schedule to Email
- Form to CRM
Business Processes:
- Lead qualification
- Customer onboarding
- Invoice processing
- Support ticket routing
Data Processing:
- CSV import and validation
- API data transformation
- Database sync operations
- Report generation
Template Documentation:
Each template needs:
- Clear description of what it does
- Required credentials
- Configuration steps
- Example use cases
- Customization guide
Sharing Templates:
- Store templates in Git repository
- Use n8n's template library feature
- Create internal documentation site
- Share via team wiki or knowledge base
Sharing Workflows with Teams
Make workflows accessible to team members who need them.
Git Repository Access:
- Use private Git repository for internal workflows
- Grant read access to team members
- Require pull requests for changes
- Use branch protection for production workflows
n8n Instance Sharing:
- Use n8n's team collaboration features
- Set appropriate permissions (view, edit, execute)
- Create shared folders for team workflows
- Use tags for discoverability
Documentation Hub:
- Maintain central README with workflow index
- Link to individual workflow documentation
- Include search functionality
- Keep ownership and contact information updated
Onboarding Process:
- Document workflow library structure
- Provide examples of common workflows
- Create video walkthroughs for complex workflows
- Assign workflow owners for questions
Pro Tip: Start with a simple folder structure and evolve it as your team grows. Don't over-organize early—you'll learn what structure works best through use.
Real-World Examples
Here are three complete examples showing how teams organize their workflow libraries.
Example 1: Small Team Workflow Library (5-10 People)
A small marketing agency uses n8n for client work and internal operations.
Structure:
n8n-workflows/
├── client-workflows/
│   ├── client-a/
│   │   ├── social-media-posting.json
│   │   ├── email-campaigns.json
│   │   └── analytics-reporting.json
│   └── client-b/
│       ├── lead-capture.json
│       └── crm-sync.json
├── internal/
│   ├── time-tracking.json
│   ├── invoice-generation.json
│   └── team-notifications.json
└── templates/
    ├── basic-email-automation.json
    └── webhook-to-sheets.json
Naming Convention:
- Client workflows:
[Client] [Purpose](e.g., "Client A Social Media Posting") - Internal workflows:
Internal [Purpose](e.g., "Internal Time Tracking") - Templates:
Template [Use Case](e.g., "Template Basic Email Automation")
Documentation:
Each workflow has a simple README with:
- Purpose (one sentence)
- Trigger description
- Required credentials
- Owner name
Version Control:
- Single Git repository
- Main branch for production workflows
- Feature branches for new client setups
- Weekly exports for backup
What this structure gives you:
- A per-client folder layout that a new team member can navigate without asking anyone
- Every workflow change tracked in Git history, so you can see what changed and when
- Weekly exports, which is what stops a workflow from being lost when someone edits it in the UI
Example 2: Enterprise Workflow Organization (50+ People)
A mid-size company runs 200+ workflows across multiple departments.
Structure:
n8n-workflows/
├── production/
│   ├── sales/
│   │   ├── lead-management/
│   │   │   ├── [Webhook] New Lead → CRM.json
│   │   │   ├── [Schedule] Daily Lead Report.json
│   │   │   └── [Manual] Lead Qualification.json
│   │   └── crm-integration/
│   │       ├── [Schedule] CRM Sync.json
│   │       └── [Webhook] CRM Update → Notify.json
│   ├── marketing/
│   │   ├── email-campaigns/
│   │   ├── social-automation/
│   │   └── analytics/
│   ├── operations/
│   │   ├── inventory/
│   │   ├── shipping/
│   │   └── reporting/
│   └── support/
│       ├── ticket-routing/
│       └── knowledge-base/
├── staging/
│   └── [mirrors production structure]
├── development/
│   └── experimental/
└── templates/
    ├── common-integrations/
    └── business-processes/
Naming Convention:
Strict pattern: [Trigger] Action → Target
Examples:
[Webhook] New Order → Inventory Update[Schedule] Daily Sales Report → Email[Gmail] Invoice Received → Accounting
Documentation:
Comprehensive README files with:
- Purpose and business value
- Detailed step-by-step flow
- All dependencies listed
- Configuration guide
- Testing procedures
- Troubleshooting section
- Owner and backup contact
Version Control:
- Separate Git repositories per department
- Branch protection on production branches
- Required code reviews for all changes
- Automated testing before deployment
- Semantic versioning with Git tags
Governance:
- Workflow approval process
- Change management procedures
- Regular documentation audits
- Quarterly workflow reviews
- Deprecation policy for unused workflows
What this structure gives you:
- A library that stays searchable at department scale, which is the point at which folder discipline stops being optional
- Fewer "what does this workflow do?" interruptions, because the answer is in the repository rather than in someone's head
- Branch protection and required review on production, so an undocumented change cannot reach production unseen
Example 3: Open-Source Workflow Contribution
A developer contributes workflows to the n8n community template library.
Structure:
awesome-n8n-workflows/
├── gmail-automation/
│   ├── auto-label-emails.json
│   ├── email-to-sheets.json
│   └── README.md
├── slack-integrations/
│   ├── channel-notifications.json
│   ├── message-routing.json
│   └── README.md
└── README.md (main index)
Naming Convention:
Descriptive, search-friendly names:
auto-label-gmail-emails-with-ai.jsonsync-slack-messages-to-google-sheets.jsonautomate-customer-support-ticket-routing.json
Documentation:
Public-facing README files with:
- Clear use case description
- Step-by-step setup instructions
- Required credentials and permissions
- Example configurations
- Troubleshooting tips
- Contribution guidelines
Version Control:
- Public GitHub repository
- Clear contribution guidelines
- Pull request template
- Code of conduct
- Regular maintenance and updates
Quality Standards:
- All workflows tested before submission
- Documentation reviewed for clarity
- Examples provided for complex workflows
- Regular updates for n8n version compatibility
What this structure gives you:
- Workflows that other people can actually adopt, because each one ships with a README and a working example
- A repository shaped for contribution, with clear guidelines, a pull request template, and a code of conduct
- Version compatibility that stays current, since n8n moves and an untended template quietly stops working
Conclusion
Workflow documentation transforms n8n from a personal tool into a team asset. Clear naming, comprehensive documentation, version control, and organized libraries make workflows maintainable and scalable.
Key takeaways:
-
Start with naming: Consistent naming conventions make workflows self-explanatory. Good names reduce the need for extensive documentation.
-
Document as you build: Don't wait until workflows are complete. Add README files and comments during development. This captures decisions while they're fresh.
-
Use version control: Git integration provides change tracking, collaboration safety, and deployment control. Export workflows regularly and commit with clear messages.
-
Organize systematically: Choose a folder structure and tagging system that matches your team's workflow. Start simple and evolve as needs grow.
-
Make it discoverable: Use tags, folders, and documentation to help team members find workflows quickly. A well-organized library reduces duplicate work.
Next steps:
Pick one area to improve this week. Start with naming conventions if your workflows have unclear names. Add README files to your most critical workflows. Set up Git version control for your workflow library.
Remember: documentation is an investment that pays off quickly. The time you spend documenting workflows saves hours later when debugging, onboarding, or making changes.
Ready to organize your n8n workflow library? Book a demo with Evalics to get personalized recommendations for documenting and managing your team's workflows.
zation Techniques 2025](/blog/ultimate-n8n-tips-and-tricks-2025) — Best practices for building efficient n8n workflows
- 5 Simple n8n Workflows for Daily Productivity — Beginner-friendly workflow examples
Official Sources
- n8n Workflows Documentation — Official guide to building n8n workflows
- n8n Workflow Templates — Template library and examples
- AI Workflow Builder Best Practices — Tips for using n8n's AI features
- Awesome n8n Templates — Community-curated workflow collection
About the Author
Kevin Michael Schindler is an AI Automation Expert at Evalics, helping small businesses and teams implement intelligent automation solutions.