You spend 2 hours every morning forwarding emails, organizing files, and scheduling social media posts. Your calendar is a mess. Important documents get lost in your Downloads folder. You know automation could help, but you've never built a workflow before—and the thought of learning a new tool feels overwhelming.
Sound familiar? You're not alone. Most small business owners waste 10–15 hours per week on repetitive tasks they could automate in under an hour. According to a recent McKinsey analysis, automation can reduce time spent on administrative tasks by 60-70%, freeing up significant time for strategic work (Source: McKinsey & Company).
Quick Win: Setting up just one n8n workflow can save you 2–3 hours per week. The five workflows in this guide take about 30 minutes each to set up and will save you 10+ hours weekly. Most beginners can have their first automation running in under 15 minutes.
n8n is a free, open-source workflow automation tool that connects your apps and services without coding. Think of it like Zapier, but free and more powerful. You can automate email forwarding, organize files automatically, schedule social media posts, sync your calendar, and back up data—all with visual workflows that anyone can understand.
This beginner's guide walks you through five ready-to-use n8n workflows step-by-step. Each workflow includes troubleshooting tips and common mistakes to avoid. By the end, you'll have working automations that save time every day.
Ready to automate your daily tasks? Book a free consultation to get personalized workflow recommendations for your business.
What Is N8N? (Quick Overview for Beginners)
n8n (pronounced "n-eight-n") is a workflow automation platform that connects your apps and services. It's like having a digital assistant that moves data between tools automatically. Learn more about n8n's capabilities in our n8n tips and tricks guide or visit the official n8n website to get started.
Why n8n for beginners:
- Free and open-source: Self-host n8n for free, or use the cloud version with a free tier
- Visual interface: Build workflows by connecting nodes—no coding required
- Powerful integrations: Connect 400+ apps including Gmail, Google Drive, Slack, Twitter, and more (source: n8n documentation)
- Self-hosted option: Run n8n on your own server for complete control and privacy
How n8n works:
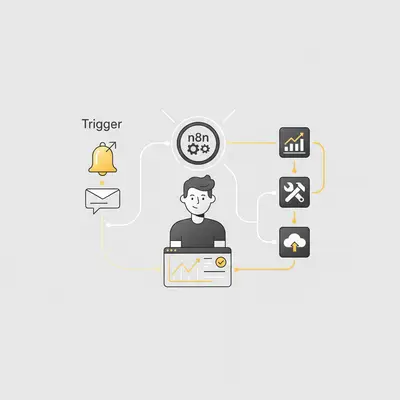
- Triggers: Something happens (new email arrives, file uploaded, scheduled time)
- Actions: n8n does something (forwards email, organizes file, posts to social media)
- Connections: You connect triggers to actions visually
Example: When you receive an email with "Invoice" in the subject, n8n automatically saves it to a Google Drive folder and sends you a Slack notification.
Key Insight: n8n workflows are like recipes. You define what happens (the trigger) and what to do about it (the actions). Once set up, they run automatically without your involvement.
Shareable Quote: "Setting up just one n8n workflow can save you 2–3 hours per week. The five workflows in this guide take about 30 minutes each to set up and will save you 10+ hours weekly."
Workflow 1: Email Forwarding Automation
Time saved: 1–2 hours per week
Difficulty: Beginner
Setup time: 15–20 minutes
Automatically forward emails based on rules—forward client emails to your team, route invoices to accounting, or send urgent emails to your phone.
Step-by-Step Setup
Step 1: Create a new workflow
- Open n8n (cloud or self-hosted)
- Click "New Workflow"
- Name it "Email Forwarding Automation"
Step 2: Add Gmail trigger
- Click the "+" button to add a node
- Search for "Gmail" and select "Gmail Trigger"
- Click "Connect Account" and authenticate with Google
- Configure the trigger:
- Event: "Email Received"
- Folder: "Inbox" (or specific folder)
- Options: Add filters (subject contains "Invoice", from specific sender, etc.)
Step 3: Add filter node (optional)
If you only want to forward specific emails:
- Add an "IF" node after the Gmail trigger
- Set condition:
{{ $json.subject }}contains "Invoice" (or your keyword) - Connect Gmail trigger to IF node
Step 4: Add Gmail action node
- Add "Gmail" node and select "Send Email"
- Configure:
- To: Enter forwarding email address
- Subject:
{{ $json.subject }}(forwards original subject) - Body:
{{ $json.textPlain }}(forwards email body) - Attachments:
{{ $json.attachments }}(includes attachments)
Step 5: Add notification (optional)
- Add "Slack" or "Telegram" node
- Send notification: "Email forwarded: {{ $json.subject }}"
Step 6: Test the workflow
- Click "Execute Workflow" to test
- Send yourself a test email matching your filter
- Verify the email is forwarded correctly
Step 7: Activate the workflow
- Toggle "Active" switch in the top right
- Workflow now runs automatically
Common Issues and Solutions
Problem: Emails not forwarding
Solution: Check Gmail authentication, verify filter conditions, ensure workflow is active
Problem: Duplicate forwards
Solution: Add "Execute Once" node or use Gmail's "Mark as Read" action to prevent re-processing
Problem: Attachments missing
Solution: Use {{ $json.attachments }} expression and ensure Gmail account has attachment access
Pro Tip: Use the "Execute Once" node to prevent the same email from being forwarded multiple times if the workflow runs twice.
Ready to set up your first workflow? Download our N8N Workflow Setup Checklist to ensure you don't miss any steps—includes step-by-step verification for each workflow type.
Workflow 2: Calendar Automation
Time saved: 30 minutes–1 hour per week
Difficulty: Beginner
Setup time: 20–25 minutes
Automatically sync calendar events, send reminders, or create events from emails or forms.
Step-by-Step Setup
Step 1: Create new workflow
- Name it "Calendar Automation"
Step 2: Add trigger
Choose your trigger based on what you want to automate:
- Schedule trigger: Run at specific times (daily, weekly)
- Google Calendar trigger: When new event is created
- Form trigger: When form is submitted (create calendar event from form)
Example: Daily calendar summary
- Add "Schedule Trigger" node
- Set to run daily at 8:00 AM
- Configure timezone
Step 3: Get calendar events
- Add "Google Calendar" node
- Select "Get Events"
- Configure:
- Calendar ID: Your calendar (or "primary")
- Time Min:
{{ $now.toISO() }}(events from now) - Time Max:
{{ $now.plus({hours: 24}).toISO() }}(next 24 hours)
Step 4: Format events
- Add "Code" node (optional, for formatting)
- Format events as readable text:
const events = $input.all();
let summary = "Today's Calendar:\n\n";
events.forEach((event) => {
  summary += `${event.json.start.dateTime} - ${event.json.summary}\n`;
});
return [{ json: { summary } }];
Step 5: Send summary
- Add "Email" or "Slack" node
- Send formatted calendar summary
- Configure recipient
Step 6: Test and activate
- Test with "Execute Workflow"
- Verify calendar events are retrieved correctly
- Activate workflow
Common Issues and Solutions
Problem: Events not showing
Solution: Check calendar permissions, verify date/time format, ensure calendar ID is correct
Problem: Timezone issues
Solution: Set timezone in Schedule Trigger and use .toISO() for consistent date formatting
Problem: Too many events
Solution: Add filter to only include events with specific keywords or from specific calendars
Pro Tip: Create a "New Event Reminder" workflow that sends you a Slack notification 15 minutes before each meeting. Use the Schedule Trigger with a webhook to check upcoming events.
Workflow 3: File Organization
Time saved: 1–2 hours per week
Difficulty: Beginner–Intermediate
Setup time: 25–30 minutes
Automatically organize files from Downloads, email attachments, or cloud storage into organized folders.
Step-by-Step Setup
Step 1: Create new workflow
- Name it "File Organization"
Step 2: Add trigger
Choose based on your needs:
- Google Drive trigger: When file is uploaded to specific folder
- Schedule trigger: Check Downloads folder periodically
- Email trigger: When email with attachment arrives
Example: Organize Downloads folder
- Add "Schedule Trigger" (runs every hour)
- Or use "Google Drive Trigger" if using Google Drive
Step 3: Get files
- Add "Google Drive" node
- Select "List Files"
- Configure:
- Folder ID: Your Downloads folder ID
- Query: Filter by file type or name pattern
Step 4: Filter files by type
- Add "IF" node
- Set conditions:
- PDF files:
{{ $json.mimeType }}equals "application/pdf" - Images:
{{ $json.mimeType }}contains "image" - Documents:
{{ $json.mimeType }}contains "document"
- PDF files:
Step 5: Move files to organized folders
- Add "Google Drive" node
- Select "Update File"
- Configure:
- File ID:
{{ $json.id }} - Add Parents: Folder ID for organized location (e.g., "PDFs" folder)
- Remove Parents: Original folder ID
- File ID:
Step 6: Add file naming (optional)
- Add "Code" node to rename files
- Format:
Invoice-{{ $now.toFormat('yyyy-MM-dd') }}-{{ $json.name }}
Step 7: Test and activate
- Upload test file to trigger folder
- Verify file is moved correctly
- Activate workflow
Common Issues and Solutions
Problem: Files not moving
Solution: Check folder permissions, verify folder IDs are correct, ensure file isn't already in target folder
Problem: Duplicate file moves
Solution: Add "Execute Once" node or check file location before moving
Problem: Wrong file types moved
Solution: Verify MIME type conditions in IF node, test with different file types
Reality Check: File organization workflows can be tricky. Start simple—organize one file type (like PDFs) before adding complexity. Test thoroughly before automating critical files.
Workflow 4: Social Media Scheduling
Time saved: 2–3 hours per week
Difficulty: Beginner
Setup time: 20–25 minutes
Automatically schedule social media posts from a Google Sheet, RSS feed, or content calendar.
Step-by-Step Setup
Step 1: Create new workflow
- Name it "Social Media Scheduling"
Step 2: Add trigger
Choose your content source:
- Google Sheets trigger: When new row is added
- Schedule trigger: Post at specific times
- RSS trigger: Post from blog RSS feed
Example: Schedule from Google Sheet
- Add "Google Sheets" node
- Select "Trigger: New Row"
- Connect Google Sheets account
- Select spreadsheet and worksheet
Step 3: Format post content
- Add "Code" node to format post
- Combine columns from sheet:
const row = $input.first().json;
return [
  {
    json: {
      text: `${row['Post Text']}\n\n${row['Link']}`,
      scheduledTime: row['Schedule Time'],
      platform: row['Platform'],
    },
  },
];
Step 4: Add delay for scheduling
- Add "Wait" node (if scheduling for future)
- Calculate delay:
{{ $json.scheduledTime }}minus current time - Or use "Schedule Trigger" with specific times
Step 5: Post to social media
- Add platform node (Twitter, LinkedIn, Facebook)
- Authenticate account
- Configure:
- Text:
{{ $json.text }} - Options: Add images, links, hashtags
- Text:
Step 6: Update sheet (optional)
- Add "Google Sheets" node
- Update row: Mark as "Posted" with timestamp
Step 7: Test and activate
- Add test row to Google Sheet
- Execute workflow manually
- Verify post appears on social media
- Activate workflow
Common Issues and Solutions
Problem: Posts not publishing
Solution: Check platform authentication, verify API permissions, ensure content meets platform requirements
Problem: Duplicate posts
Solution: Add "Execute Once" node or check sheet for "Posted" status before posting
Problem: Scheduling not working
Solution: Verify date/time format, check Wait node configuration, test with immediate posts first
Pro Tip: Start with one social media platform (like Twitter) before adding multiple platforms. Test with a private account first to avoid posting mistakes publicly.
Workflow 5: Data Backups
Time saved: Prevents data loss (invaluable)
Difficulty: Beginner
Setup time: 15–20 minutes
Automatically back up important data from Google Drive, databases, or files to cloud storage.
Step-by-Step Setup
Step 1: Create new workflow
- Name it "Data Backup"
Step 2: Add trigger
- Add "Schedule Trigger"
- Set to run daily at 2:00 AM (or your preferred time)
- Configure timezone
Step 3: Get files to backup
- Add "Google Drive" node
- Select "List Files"
- Configure:
- Folder ID: Folder containing files to backup
- Query: Filter by date modified (only backup new/changed files)
Step 4: Filter files (optional)
- Add "IF" node
- Filter by:
- File type (only backup important types)
- Date modified (only backup files changed in last 24 hours)
- File size (skip very large files)
Step 5: Copy files to backup location
- Add "Google Drive" node
- Select "Copy File"
- Configure:
- File ID:
{{ $json.id }} - Name:
{{ $json.name }}(or add date:Backup-{{ $now.toFormat('yyyy-MM-dd') }}-{{ $json.name }}) - Parents: Backup folder ID
- File ID:
Step 6: Add backup log (optional)
- Add "Google Sheets" node
- Log backup details:
- File name
- Backup date/time
- Backup location
- File size
Step 7: Test and activate
- Execute workflow manually
- Verify files are copied to backup folder
- Check backup log (if added)
- Activate workflow
Common Issues and Solutions
Problem: Files not backing up
Solution: Check folder permissions, verify backup folder exists, ensure sufficient storage space
Problem: Backing up too many files
Solution: Add filters for file type, date modified, or file size to only backup important files
Problem: Storage filling up
Solution: Add workflow to delete old backups (keep last 30 days) or compress files before backing up
Key Insight: Data backups are insurance. You may never need them, but when you do, they're invaluable. Set up backups for critical files (invoices, contracts, client data) even if you think you don't need them.
Common Beginner Mistakes (And How to Avoid Them)
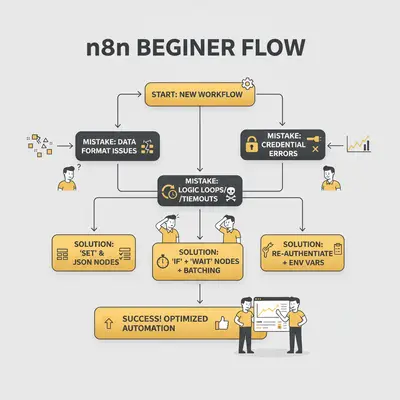
Most beginners make the same mistakes when starting with n8n. Here's how to avoid them:
Mistake 1: Not Testing Workflows Before Activating
The problem: You build a workflow, activate it immediately, and it breaks or does something wrong.
Real example: A 10-person agency set up an email forwarding workflow without testing. It forwarded every email (including spam) to their client, sending 500+ emails in one day. The client was not happy.
The solution: Always test workflows manually first:
- Click "Execute Workflow" to test
- Verify each step works correctly
- Test with real data (but in a safe way)
- Only activate after thorough testing
Reality Check: Testing takes 5–10 minutes. Fixing a broken workflow that's already running can take hours and cause real problems. Always test first.
Mistake 2: Creating Infinite Loops
The problem: A workflow triggers itself, creating an endless loop that runs forever.
Real example: A workflow that creates a Google Drive file, which triggers the workflow again, which creates another file, and so on. Result: 1,000+ duplicate files created in minutes.
The solution:
- Use "Execute Once" node to prevent re-triggering
- Add conditions to check if action is needed before executing
- Use filters to exclude files/events created by the workflow itself
Example: When organizing files, exclude files with "Organized-" prefix to prevent re-processing.
Mistake 3: Not Handling Errors
The problem: Workflow fails silently, and you don't know until it's too late.
Real example: A backup workflow fails for 2 weeks because of a permission error. You only discover it when you need the backup—and it's not there.
The solution:
- Add "Error Trigger" node to catch failures
- Send notifications when workflows fail (Slack, email)
- Add retry logic for transient errors
- Log errors to a Google Sheet for tracking
Mistake 4: Over-Complicating Workflows
The problem: You try to do everything in one workflow, making it hard to debug and maintain.
Real example: A 50-node workflow that handles email forwarding, file organization, calendar syncing, and social media posting all in one. When it breaks, you can't figure out which part failed.
The solution:
- Keep workflows focused (one workflow = one task)
- Break complex workflows into smaller sub-workflows
- Use descriptive node names
- Add comments/documentation in workflow
Pro Tip: If a workflow has more than 10 nodes, consider splitting it into multiple workflows. Simpler workflows are easier to debug, test, and maintain.
Mistake 5: Not Setting Up Proper Authentication
The problem: Workflows break when API tokens expire or authentication fails.
Real example: A social media scheduling workflow works for 3 months, then stops when the Twitter API token expires. You lose a week of scheduled posts.
The solution:
- Use OAuth authentication (not API keys) when possible
- Set up token refresh workflows
- Monitor authentication status
- Test authentication periodically
Mistake 6: Ignoring Rate Limits
The problem: Workflow hits API rate limits and fails, or you get banned from a service.
Real example: A workflow processes 1,000 emails in one run, hitting Gmail's rate limit. Gmail temporarily blocks the account.
The solution:
- Use "SplitInBatches" node to process in smaller groups
- Add delays between API calls
- Respect rate limits (check API documentation)
- Monitor API usage
Free vs Paid N8N Plans: Which Do You Need?
n8n offers multiple deployment options. Here's what you need to know:
Option 1: Self-Hosted (Free)
Cost: $0 (you host it yourself)
Best for: Technical users, privacy-conscious businesses, unlimited workflows
What you get:
- Full n8n functionality
- Unlimited workflows
- Unlimited executions
- Complete control and privacy
- No vendor lock-in
Requirements:
- Your own server (VPS, cloud instance, or local machine)
- Basic technical knowledge (Docker or Node.js)
- Time to set up and maintain
Real-world example: A 12-person agency self-hosts n8n on a $10/month DigitalOcean droplet. They run 50+ workflows processing thousands of records daily. Total cost: $10/month for hosting.
Reality Check: Self-hosting is free, but you're responsible for updates, security, backups, and troubleshooting. If you're not technical, the "free" option can cost you hours of time.
Option 2: n8n Cloud (Free Tier)
Cost: Free tier available, paid plans start at $20/month
Best for: Beginners, small businesses, teams that want managed hosting
Free tier includes:
- Limited workflow executions per month
- Basic integrations
- Community support
- Managed hosting and updates
Paid plans include:
- More workflow executions
- Advanced features (webhooks, error workflows)
- Priority support
- Team collaboration features
Real-world example: A 5-person team uses n8n Cloud free tier for 3 workflows (email forwarding, file organization, calendar sync). They process ~500 executions/month, staying within free limits. Cost: $0.
When to upgrade:
- You exceed free tier execution limits
- You need advanced features (webhooks, error handling)
- You need team collaboration
- You want priority support
Pro Tip: Start with the free tier. Most beginners stay within free limits for months. Upgrade only when you hit limits or need advanced features.
Option 3: n8n Cloud (Paid Plans)
Cost: Starting at $20/month (as of 2025)
Best for: Growing businesses, teams, high-volume workflows
What you get:
- Higher execution limits
- Advanced features
- Team collaboration
- Priority support
- Managed infrastructure
Real-world example: A 20-person agency uses n8n Cloud Pro ($50/month) for 15 workflows processing 5,000+ executions/month. They need webhooks, error workflows, and team access. Cost: $50/month, saves 20+ hours/week.
Recommendation by Workflow Type
Email forwarding, calendar automation, file organization:
- Free tier is sufficient for most users
- Typical usage: 100–500 executions/month
- Self-hosted option if you're technical
Social media scheduling:
- Free tier works for 1–2 platforms, limited posts
- Paid plan needed for multiple platforms, high-volume posting
- Consider self-hosted for unlimited posts
Data backups:
- Free tier works for daily backups of small folders
- Paid or self-hosted for large-scale backups, multiple sources
- Self-hosted recommended for privacy-sensitive data
Key Insight: Most beginners can accomplish all five workflows in this guide using the free tier. Don't pay for a plan until you actually need the features or hit execution limits.
How to Customize Workflows for Your Needs
Once you have the basic workflows working, customize them for your specific needs:
Customization Strategy
Step 1: Identify your specific requirements
- What triggers do you need? (Email, schedule, webhook, form submission)
- What actions do you want? (Forward, organize, post, backup)
- What conditions matter? (File type, sender, time, content)
Step 2: Modify existing workflows
- Start with a working workflow from this guide
- Add filters for your specific conditions
- Change destinations (folders, emails, platforms)
- Add additional actions (notifications, logging)
Step 3: Combine workflows
- Chain workflows together (output of one triggers another)
- Use sub-workflows for reusable logic
- Create workflow templates for common patterns
Example Customizations
Email forwarding workflow:
- Add condition: Only forward emails from specific senders
- Add action: Save forwarded emails to Google Drive
- Add notification: Send Slack message when important email is forwarded
- Add logging: Track forwarded emails in Google Sheet
File organization workflow:
- Add condition: Organize by date (2025/01/ folder structure)
- Add action: Rename files with consistent format
- Add notification: Alert when large files are organized
- Add backup: Copy organized files to backup location
Social media scheduling workflow:
- Add platforms: Post to multiple platforms (Twitter, LinkedIn, Facebook)
- Add formatting: Auto-add hashtags, format links
- Add images: Attach images from Google Drive
- Add analytics: Track post performance
Pro Tip: Customize one workflow at a time. Get it working perfectly before moving to the next. Document your customizations so you can recreate them later.
Advanced Customization Tips
Use Code nodes for complex logic:
- Format data before sending
- Calculate values (dates, totals, percentages)
- Transform data structures
- Add conditional logic
Use Switch nodes for multiple paths:
- Route emails to different folders based on sender
- Post to different platforms based on content type
- Organize files by multiple criteria
Use sub-workflows for reusable logic:
- Create "Send Notification" sub-workflow
- Create "Log Activity" sub-workflow
- Reuse across multiple workflows
Next Steps: Scaling from One Workflow to Many
Once you have your first workflow working, here's how to scale:
Week 1: Master One Workflow
- Choose the workflow that saves you the most time
- Set it up, test it thoroughly, and use it daily
- Identify any issues or improvements needed
Week 2: Add Your Second Workflow
- Choose the next most valuable workflow
- Apply lessons learned from the first workflow
- Document what works and what doesn't
Week 3–4: Build Your Workflow Library
- Add remaining workflows from this guide
- Customize each for your specific needs
- Create a workflow inventory (what each one does, when it runs)
Month 2: Advanced Workflows
- Combine workflows (chain them together)
- Create sub-workflows for reusable logic
- Add error handling and monitoring
- Optimize workflows for performance
Ongoing: Maintenance and Optimization
- Review workflows monthly for improvements
- Monitor for errors and fix issues promptly
- Update workflows when apps/services change
- Document workflows for team members
Reality Check: Building one workflow takes 30 minutes. Building 10 workflows takes 5–6 hours. But those 10 workflows can save you 20+ hours per week. The time investment pays off quickly.
Conclusion
You don't need to be a developer to automate your daily tasks. With n8n, you can set up workflows that save hours every week—even as a complete beginner.
The five workflows in this guide will:
- Save you 10+ hours per week
- Take about 2 hours total to set up
- Work automatically once configured
- Be customizable for your specific needs
Start with one workflow (email forwarding or file organization are good first choices). Get it working, use it for a week, then add the next one. Within a month, you'll have all five running and saving time daily.
Remember:
- Always test workflows before activating
- Start simple, then add complexity
- Document your workflows
- Monitor for errors
Ready to automate your workflows? Book a demo with Evalics to get personalized workflow recommendations and expert setup assistance.
Frequently Asked Questions
Do I need coding knowledge to use n8n?
No. n8n uses a visual interface where you connect nodes. No coding required. However, basic technical knowledge helps for self-hosting or advanced customizations.
Is n8n really free?
Yes. You can self-host n8n completely free, or use the free cloud tier with limited executions. Most beginners stay within free limits.
How long does it take to set up a workflow?
Simple workflows (email forwarding, file organization) take 15–20 minutes. More complex workflows (social media scheduling with multiple platforms) take 30–45 minutes.
Can I use n8n with my existing tools?
Yes. n8n integrates with 400+ apps including Gmail, Google Drive, Slack, Twitter, LinkedIn, and more. Check the n8n documentation for your specific tools. You can also explore the n8n community forum for workflow examples and support.
What if my workflow breaks?
n8n includes error handling. Set up error triggers to get notified when workflows fail. Most issues are authentication-related or rate limit problems—both are fixable.
Do I need to keep n8n running?
If self-hosting, yes—n8n needs to run continuously. If using n8n Cloud, it runs automatically. For self-hosted, consider running on a VPS or cloud instance that's always on.
Can I share workflows with my team?
Yes. n8n allows you to export/import workflows as JSON files. Paid plans include team collaboration features. Self-hosted users can share access to the n8n instance.
Is n8n secure?
Yes. n8n uses OAuth for authentication, encrypts credentials, and you control where data is stored (especially with self-hosting). Follow security best practices (strong passwords, regular updates).
By Kevin Michael Schindler, AI Automation Expert at Evalics
What's your biggest automation challenge? Share your experience with n8n workflows in the comments below.