You spend two hours every morning answering the same questions. You dig through company files to find standard operating procedures. You draft repetitive emails to clients. Your calendar is a mess, and your team is waiting on you for answers.
You know AI can help, but standard ChatGPT doesn't know your business. It forgets context. It requires you to copy and paste data manually every single time.
You need a custom AI assistant.
The good news? You do not need a software degree or a $10,000 agency retainer to get one. You can build a highly specific, custom AI assistant in under an hour using no-code tools.
Here is exactly how to do it.
Why Custom Assistants Beat Generic Chatbots
When you use the public version of ChatGPT or Claude, you start with a blank slate. You have to explain your business, your tone, and your rules in every single chat.
A custom AI assistant lives inside your existing workflows. It already knows your rules. It connects directly to the apps you use every day, like Slack, Telegram, or your email inbox.
Key Insight: The most successful small businesses do not use one massive AI to do everything. They build several small, highly focused AI assistants that do one specific job perfectly.
Last month, I helped a local marketing agency build an onboarding assistant. Before AI, the founder spent three hours a week answering basic questions from new clients on Slack. We connected their Slack channel to a no-code platform, plugged in OpenAI, and gave it their onboarding manual. The whole setup took 45 minutes. The founder won back three hours a week instantly.
The 1-Hour Tech Stack
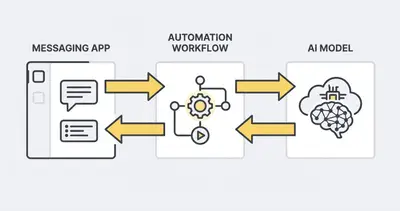
To build this fast and without code, we need three layers:
- The Brain: The AI model (OpenAI GPT-4o or Anthropic Claude).
- The Interface: Where you talk to the AI (Slack, Discord, or Telegram).
- The Glue: The automation platform that connects them (n8n or Make.com).
For this guide, we will use n8n as our automation platform. It is visual, powerful, and integrates perfectly with AI tools.
Step 1: Define the Assistant's Single Purpose (5 Minutes)
Do not build an assistant that "helps with business stuff." It will fail. Pick one clear, painful bottleneck.
Choose a simple use case for your first build:
- The FAQ Bot: Answers basic questions based on a single company document.
- The Email Drafter: Reads incoming emails and writes polite, accurate draft replies.
- The Grammar Checker: Takes rough notes and turns them into professional updates.
For this tutorial, we will build an Internal FAQ Assistant. It will live in Telegram, read a specific system prompt about your company policies, and answer team questions instantly.
Step 2: Get Your API Keys (10 Minutes)
You need digital keys to let your tools talk to each other.
- Get your AI Key: Go to the OpenAI Developer Platform. Sign up, add $5 to your billing balance, and generate a new API key. Copy this key and save it somewhere secure. (Need help? Read our guide on What Is an API Key a Simple Guide for AI Automation).
- Get your App Key: If using Telegram, talk to the "BotFather" account to create a new bot and get an API token. (We have a full Telegram BotFather n8n Automation Guide if you get stuck).
- Set up n8n: Create a free account at n8n.io or log into your Make.com account. Create a new, blank workflow.
Step 3: Set Up the Trigger (10 Minutes)
Your workflow needs to know when to start.
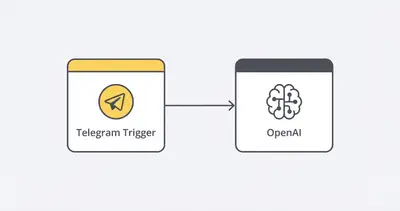
- In your blank n8n workflow, add a new node.
- Search for "Telegram" (or your chosen app).
- Select "Telegram Trigger" and choose "On Message."
- Click "Add Credential" and paste the token you got from BotFather.
- Click "Listen for Event." Send a test message like "Hello" to your bot from your phone.
The node will flash green. Your automation just received your message.
Quick Win: Pin your bot's chat to the top of your messaging app so you can test it easily as you build.
Step 4: Connect the AI Model (10 Minutes)
Now, we route that message to the brain.
- Add a new node after the Telegram trigger.
- Search for "Basic LLM Chain" or use the "OpenAI Chat Model" node.
- Connect your OpenAI API key by creating a new credential.
- Select your model. Choose
gpt-4o-mini. It is lightning-fast and incredibly cheap. - Map the input. Tell the AI node to look at the "Message Text" coming from the Telegram trigger.
Step 5: Write the System Prompt (15 Minutes)
This is the most critical step. The system prompt tells the AI who it is and how to behave.
If you leave this blank, the AI will act like generic ChatGPT. If you write a strong prompt, it becomes a specialized business asset.
Inside the AI node settings, locate the "System Message" box. Write a strict, clear persona.
Example Prompt for an FAQ Bot:
"You are the HR Assistant for Acme Corp. Your job is to answer employee questions clearly and kindly. Keep answers under 3 sentences.
Here are our core policies:
- Office hours are 9 AM to 5 PM EST.
- Employees get 15 days of PTO per year.
- To request time off, employees must email sarah@acmecorp.com.
If someone asks a question not covered by these rules, say: 'I don't have that information. Please ask Sarah in HR.'"
Pro Tip: Never assume the AI knows what you want. Give it constraints, format rules, and an "escape hatch" (what to do when it doesn't know the answer). Read our Prompt Engineering Step-by-Step Checklist for more frameworks.
Step 6: Send the Answer Back (5 Minutes)
The AI has generated an answer. Now you must send it back to the user.
- Add a final node to your workflow.
- Search for Telegram again. This time, choose the regular "Telegram" node (not the trigger).
- Select the "Send Message" action.
- For the "Chat ID," map it dynamically to the Chat ID from your original trigger step. This ensures the bot replies to the correct person.
- For the "Text," map it to the output text from your AI node.
Step 7: Test and Deploy (5 Minutes)
You are almost done.
- Click "Test Workflow" in n8n.
- Open your phone and message your bot: "How much time off do I get?"
- Watch the workflow run. Within two seconds, your bot should reply: "Employees get 15 days of PTO per year."
- Toggle the workflow to "Active."
Congratulations. You just built a custom AI assistant.
Reality Check: Your first assistant will not be perfect. It might misunderstand a complex question. That is normal. Do not abandon the project. Just go back to Step 5, update the system prompt to handle that edge case, and test again.
Avoiding Common Beginner Mistakes
When building your first AI assistant, avoid these common traps:
Giving it too much power. Do not let your first bot send emails to clients automatically. Keep it internal. Use it to draft emails, answer your own team's questions, or summarize notes. Keep a "human in the loop" until you trust the system completely.
Ignoring context windows. If you paste a 100-page PDF into the system prompt, the AI will get slow and expensive. Keep system prompts short and focused. For massive amounts of data, you will eventually need a technique called RAG (Retrieval-Augmented Generation).
Not tracking costs. AI API usage is cheap, but a broken workflow stuck in a loop can drain your balance. Set a hard billing limit in your OpenAI dashboard (e.g., $10 per month) to prevent surprises.
To understand the difference between basic tools and full workflows, review AI Agents vs Automations.
Next Steps to Scale Your Assistant
Once you have this basic loop running, the possibilities are endless. You can expand your assistant's capabilities over time.
- Add Memory: Right now, your bot treats every message as a brand-new conversation. You can add "Memory" nodes in n8n so the bot remembers what you said five minutes ago.
- Add Tools: You can give your bot the ability to act. Add a node that searches the web, or a node that adds rows to a Google Sheet when you type a specific command.
- Add Vision: Switch the trigger to accept images. Send your bot a photo of a receipt, and have the AI extract the total amount and log it into your accounting software.
If you want to map out your next build, check out Your First AI Automation Complete Step-by-Step Guide No Coding Required.
Summary and Key Takeaways
Building a custom AI assistant is no longer a six-month software project. It is an afternoon activity.
- Start simple. Pick one repetitive task to automate first.
- Use the right stack. Connect a messaging app (Telegram/Slack) to an automation tool (n8n/Make) and an AI model (OpenAI/Claude).
- Focus on the prompt. Your system prompt dictates the quality of your assistant. Give it strict rules and exact data.
Stop typing the same answers over and over. Take one hour this week, follow these steps, and win your time back.
Ready to implement AI without the technical headache? Book a demo with Evalics and let our team map out the perfect custom automation strategy for your business.
By Kevin Michael Schindler, AI Automation Expert at Evalics.
Related Resources
- Your First AI Automation Complete Step by Step Guide No Coding Required
- Prompt Engineering Step by Step Checklist
- AI Agents vs Automations
- What Is an API Key a Simple Guide for AI Automation