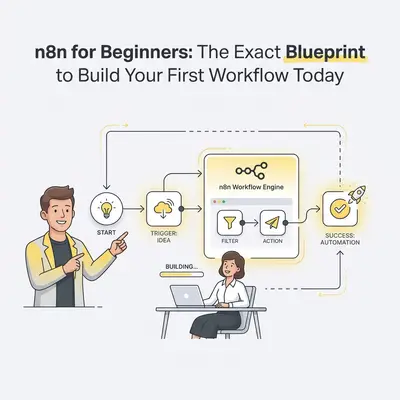
You stare at the screen, watching another repetitive task eat up your morning. You know automation is the answer, but every time you look at tools like Zapier or Make, the costs seem to spiral, or the "simple" interface feels too limiting.
Then you hear about n8n.
It promises the flexibility of code with the ease of drag-and-drop. But when you first open the canvas, it looks blank and intimidating. There are nodes, connections, and JSON data. Where do you even start?
This is the exact blueprint I wish I had when I started. We aren't just talking about theory here. By the end of this guide, you will understand the interface, grasp the core concepts, and build a real, functioning automation that you can use today.
Why n8n is Different (And Why It Matters)
Most automation tools force you into a linear box: Trigger → Action 1 → Action 2.
n8n is different. It’s a flowchart. You can branch, loop, merge, and transform data in ways that other tools struggle to handle.
Key Insight: Think of Zapier as a train track—it goes in one line. Think of n8n as a circuit board—you can route electricity (data) anywhere you need it to go.
This flexibility usually comes with a steep learning curve, but we are going to flatten that curve right now.
The 3 Core Concepts You Must Know
Before dragging a single node, you need to understand three terms. If you get these, you get n8n.
1. The Trigger (The "When")
Every workflow needs a starting gun. In n8n, this is the Trigger Node.
- Time-based: "Run every morning at 9 AM."
- Event-based: "Run when a new row is added to Google Sheets."
- Webhook-based: "Run when this specific URL receives data."
2. The Node (The "What")
Nodes are the steps in your process. They perform actions.
- Action Nodes: Send an email, post to Slack, create a database entry.
- Logic Nodes: If/Else (Switch), Merge, Wait.
- Data Nodes: Format dates, edit text, filter lists.
3. The JSON (The "Fuel")
This is the part that scares beginners, but it shouldn't. n8n passes data between nodes in a format called JSON (JavaScript Object Notation). You don't need to write it, but you need to know that data flows output to input.
When Node A finishes, it passes a packet of data to Node B. Node B can only "see" what Node A gave it.
Phase 1: Setting Up Your Environment
You have two main choices for running n8n.
- n8n Cloud (Recommended for Beginners): This is the paid, hosted version. It works out of the box with zero setup. If you value your time over a small monthly fee, start here.
- Self-Hosted: You can run n8n on your own server. This is cheaper (often free) but requires technical knowledge of Docker and server management.
For this blueprint, we assume you are logged into the n8n editor (Cloud or Desktop version).
Pro Tip: Download the n8n Desktop app for free. It runs locally on your computer. It’s the perfect sandbox to learn without paying for a subscription or setting up a server.
Phase 2: The Blueprint Build (Step-by-Step)
We are going to build a "Lead Notifier." The Goal: When you receive a mock lead (data), n8n will format the message and send it to a communication channel (like Slack or Email).
Step 1: Add the Trigger
- Click the + button (or "Add first step").
- Search for "Manual Trigger" (or "On clicking 'execute'").
- Select it. Why? This allows us to test the workflow immediately without needing an external app to fire events yet.
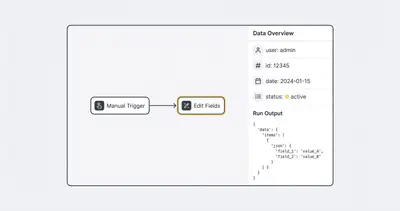
Step 2: Create Mock Data
In a real scenario, data comes from a form. For building, we will simulate it.
- Click the + on the canvas.
- Search for the "Edit Fields" (formerly Set) node.
- Connect the Trigger to the Edit Fields node.
- In the "Edit Fields" settings, add three values:
Name: "John Doe"Email: "john@example.com"Interest: "Automation Services"
You have just created your fuel.
Step 3: Add Logic (Optional but Powerful)
Let's filter the lead. We only want to be notified if they are interested in "Automation Services."
- Add a "If" node (formerly Switch).
- Connect the Edit Fields node to the If node.
- In parameters:
- Value 1: Drag the "Interest" field from the Input Data panel (on the left).
- Condition: Equal to.
- Value 2: "Automation Services".
- Now, the workflow has two paths: True and False.
Step 4: The Action
We will send an email for the "True" path.
- Add a "Gmail" (or Outlook/Slack) node.
- Connect the "True" output of the If node to the Gmail node.
- Authentication: You will need to connect your Google account (n8n makes this easy with a "Sign in with Google" button in the Cloud version).
- Configuration:
- To: Your own email address.
- Subject: New Hot Lead: [Drag "Name" here]
- Body: [Drag "Name"] is interested in [Drag "Interest"]. Contact them at [Drag "Email"].
Quick Win: Using the "Expression Editor" (dragging and dropping green pills) is how you make data dynamic. Never type "John Doe" in the email body; always drag the variable so it works for any lead.
Step 5: Test It
- Click "Execute Workflow" at the bottom.
- Watch the green lights flow from Trigger → Edit Fields → If → Gmail.
- Check your inbox.
If you received the email, you just built an automated data pipeline.
Understanding the Economics: n8n vs. Zapier
Why go through this effort instead of using Zapier? It comes down to volume and cost.
Zapier charges per "task." Every time that email sends, it costs you. n8n charges for the "workflow execution" or simply for the server power, depending on your plan.
Here is what happens when you scale.
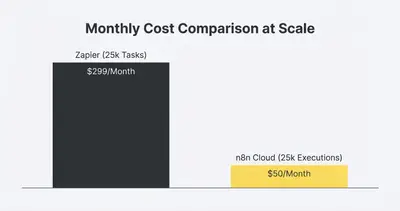
When your business grows, this difference becomes massive. A simple detailed comparison can be found in our post on n8n vs Make.
3 Beginner Mistakes to Avoid
Three traps break most beginner workflows.
1. Ignoring Error Handling
What happens if the Gmail node fails because your password changed? The workflow stops, and the lead is lost forever.
- Fix: Use the "Error Trigger" node or modify the settings of your nodes to "Continue On Fail." Learn more about how to debug automation effectively.
2. Hardcoding Data
Beginners often type "2025-10-18" into a date field. Tomorrow, that workflow is wrong.
- Fix: Always use dynamic expressions like
{{ $now }}.
3. The "Infinite Loop"
If you set a trigger to "Watch for New Email" and the action is "Send Email," you might create a loop where n8n replies to itself 1,000 times in a minute.
- Fix: Always add specific filters to your triggers (e.g., "Subject does NOT contain 'Re:'").
Next Steps: What to Build
Now that you have the blueprint, don't just sit there. Build something real.
Here are three simple ideas to start today:
- Social Monitor: Watch Reddit for keywords about your business -> Send to Slack.
- Receipt Organizer: Watch Gmail for attachments -> Upload to Google Drive.
- Meeting Notes: Watch Calendar for ended meetings -> Create a Google Doc for notes.
Reality Check: Your first workflow will probably break. That is part of the process. The "Execute" button is your best friend. Read the error message, adjust the node, and try again.
Once you are comfortable with the basics, you can start integrating AI agents into your flow. Imagine replacing that simple "Edit Fields" node with an AI that reads the lead's email and drafts a personalized reply for you. (See our guide on 5 simple n8n workflows for inspiration).
Conclusion
Building your first n8n workflow isn't about mastering code; it's about mastering logic. You trigger an action, process the data, and send it where it needs to go.
Key Takeaways:
- Think in Flows: Move away from linear thinking. Visualize the path of your data.
- Start Simple: Use the Manual Trigger and mock data to build your logic before connecting live apps.
- Scale Smart: Moving to n8n early saves you significant money as your automation volume grows.
The blueprint is in your hands. Open the canvas and build your first node.
Ready to take your automation deeper? Check out What Is an API Key to understand how to connect n8n to almost any software on the planet.
Related Resources
- n8n vs Make: Why Small Businesses are Switching
- 5 Simple n8n Workflows for Daily Productivity
- How to Debug Automation When It Stops Working
- n8n Workflow Documentation Best Practices
Official Sources
- n8n Academy (Official)
- n8n Documentation
- n8n Community Forum